


Purifying Water by Distillation
A vital survival skill for bush, desert and coastline

That old rule-of-thumb, the Rule of Threes tells us that on average, a human being can survive for only three days without water. Actually it can be closer to four or six days depending on activity levels, temperature and humidity, but no matter the timeframes involved, it’s clear that if you don‘t get enough water into you, sooner rather than later you’re going to be dead from dehydration.

Water is all around us, but it’s not always drinkable. If you’re on the coast, there’s a limitless supply of sea water, but if you drink it, you’ll die due to the high salt content. Even diluting salt water with limited amounts of fresh water is no answer. The effect of drinking seawater is that the kidneys cannot process it due to the high salt concentration. If water has more salt content than your urine, it can’t be processed) by the body. Seawater has a much higher osmotic pressure than normal human body fluids so the effect of drinking and absorbing it is to increase the salt concentration in the body and so worsen dehydration. In short, it’ll kill you just as certainly as if you hadn’t drunk anything at all.
Water is locked up in the rhizomes and tubers of various ferns and other plants, but unless you know exactly what species you’re dealing with, there’s a strong possibility that chewing on some juicy random rhizome will at best make you very sick. Vomiting dehydrates you further, as does the act of digging up the aforementioned juicy fern rhizomes. Once again, you’d have been better off if you hadn’t drunk the fluid at all.
Animal fluids from the stomach, entrails, blood, flesh, bladder (including your own urine), etc. should not be drunk. Blood and juicy fish flesh contains proteins and salts which will dehydrate you when you try to digest the fluid. Urine is a bodily waste product, and as you become more dehydrated, the waste products in the urine concentrate. Introducing them back into the body serves only to make the kidneys work harder and will dehydrate you more than if you hadn’t drunk it.
Flipping over rocks in shaded areas, even in the arid zones, often reveals damp earth. Mud contains a high proportion of water, but you can’t drink it. The act of trying to squeeze fresh water out of damp earth or mud and then purify it will use more fluids than you gain.
What you need to do in these situations is to extract the good water from the bad and you need to do it in a way that conserves your body’s own moisture as much as possible. A solution to this problem is distillation.
For the purposes of this article, distillation refers to the process of heating contaminated liquids to their boiling point, capturing the steam and cooling the steam back into a liquid which is drained off, cooled further and can be drunk. This liquid is fresh water and is for the most part safe to drink as long as it hasn’t been contaminated in any way during the distillation process.
There are a couple of dozen effective techniques for distilling good water from bad, which are useful in a bush or coastal survival situation. Some of these require more equipment than others, but all involve heat, whether it’s heat from the sun or heat from a fire, so this is just another reason why it’s imperative to carry firemaking tools and know how to use them. Your chances of securing a life-saving drink rely directly upon your ability to make fire.
We’ll start with some basic, “no-equipment” techniques and move on to more complex solutions useful in a group survival situation.
A "no-equipment" technique for distilling drinking water
Assuming you’re not injured, and so can make fire and can scrape a bit of a depression in the dirt, you can use the rock boiling method to distill water.
This simply involves building a fire and heating some rocks red hot - NOT round river rocks, which are liable to explode if heated, even in dry country. Scrape a depression in the ground and fill it with the undrinkable water. Clayey soils work best for this purpose, but if necessary, line the hole with strips of bark, gum leaves weighted down with pebbles, etc. Anything to reduce the amount of liquid which seeps away into the ground.
Make a bit of a tripod or platform out of sticks and onto this lay your clothing. The clothes will absorb the steam and condense it into liquid.
Now add red hot rocks to the water in the depression and immediately there will be clouds of steam caught by the hung clothing.
When the steam-catcher clothing is cool enough, squeeze the water directly into your mouth or drain it into a container. Keep adding more rocks, recycling them through the fire and through the water-filled depression until your supply of contaminated water runs out or you have enough distilled water to fulfill your immediate needs.
Be wary of burning yourself both on the hot rocks and on the hot steam while using this method. The rock-boiling method is probably the most inefficient of the methods described in this article, and it’s really only of use if large amounts of liquid are available, but if used correctly it could save a life.
“SURVIVAL KIT” TECHNIQUES FOR DISTILLING DRINKING WATER
A personal survival kit for Australian conditions should always include a boiling vessel (or tough foil to improvise one), and a couple of plastic bags. If you build your kit around a canteen and cup, you’re already ahead of the game when it comes to procuring water in Australian conditions.
Desert Still
The most commonly-known method for distilling water in a survival situation is the desert or solar still. Equipment-wise it just requires a container - your PSK container is fine, and a sheet of plastic - use one of your transpiration bags or in a pinch, a hootchie will even sort of work.
Don’t try and construct a desert still in the heat of the day or you’ll lose more water in sweat than the still will provide. Set it up in the cool of the night if you can, and in an area which will have the longest amount of direct sunlight during the day.

Dig a hole about 50cm deep and 1m wide and fill it with leafy vegetation, urinate into it or pour in any other contaminated liquid. Place your container directly in the centre of the hole, and cover the hole with plastic, sealing the edges with spoil dug from the hole. Place a pebble in the centre of the plastic so that any condensed water vapour drips directly into your container.
If your PSK includes a length of rubber tubing (a good idea by the way), route this into the container before sealing the plastic and cork it with a bit of wood or tie a knot in it. This tube will serve as a drinking straw and you won’t have to tear apart the still during the day to get water.
The Above-Ground Desert Still
Almost identical in operation to a desert still, this technique is more energy efficient. You’ll need a plastic bag, a transpiration bag from your survival kit will do nicely, a source of contaminated water and/or green vegetation, and a bit of sloping ground.
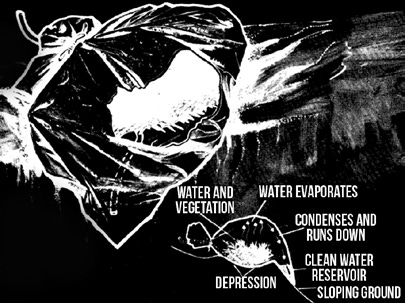
This method can be used with cut vegetation, but for that purpose, a transpiration bag tied to a living tree branch is far more efficient. Where this method excels is distilling good water out of bad. It does require some very careful handling so as to avoid contaminating the good water, since all that stands between the contaminated source water and the reservoir of clean, distilled water is a depression in the ground.
To construct this still, find a piece of sloping ground in a position where it will have maximum sunlight through out the day. Kick out a depression at least 50cm wide by about 20cm deep. Open your transpiration bag and place it in the depression. Fill the depression (inside the bag) with contaminated water and/ or green vegetation. Carefully drag a corner of the bag down the slope from the depression. This corner will become your reservoir of clean water. Inflate the bag slightly with a few quick breaths and tie it shut.
Sunlight will evaporate the contaminated water and it will condense against the plastic and most of it will run down into the reservoir. It is best to either puncture the reservoir to remove the water (sealing the hole with tape from your survival kit) or add a rubber tubing drinking straw when constructing the still. If distilling from contaminated water be sure not to foul your distilled water.
The Metal Canteen and Cup
Similar to the rock-boiling method, you can boil contaminated water in a canteen cup and catch the steam in some folded clothing. The biggest difference is that since you have a boiling vessel, you can now also condense water out of mud, animal or fish entrails, urine, etc. directly.
Keep your fire small and add a latticework of sticks to the top of the cup. Upon this, lay your folded shirt, socks, soft hat, etc. The steam will be caught in the clothing. When cool enough to do so, wring the clothing out into your canteen.
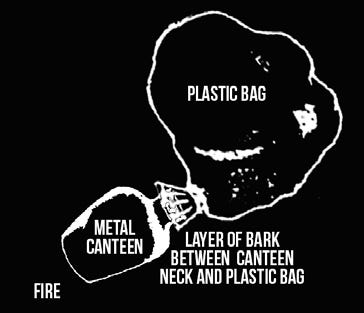
If you have a metal canteen on your belt (highly recommended), and a transpiration bag in your personal survival kit (also highly recommended), you can distill good water from bad water. Wrap strips of green bark around the neck to insulate the plastic bag from the heat of the metal. Fill your canteen half full with the contaminated water and tie your transpiration bag onto the neck of the canteen. Place the bottom of the canteen onto a low fire, making sure to shield the plastic bag from the heat and flames as much as possible. Drag down one corner of the bag to serve as a clean water reservoir and wait. The water in the canteen will boil, the steam will condense on the plastic and clean water will run down into the reservoir.
If you have a canteen cup lid which overhangs the lip of the cup, you can use the billy lid method described later. If you modify your canteen cup lid with the addition of a grease nipple with the spring and ball bearing removed, and if you have included some rubber or vinyl tubing in your kit, you can distill water directly into your canteen.
Make sure the cup is only 2/3rds full to avoid splashing into the condensing tube, and also make sure that the fire is no larger than needed to bring the cup to a boil and maintain it. If flames are licking too far up the sides of the cup they could burn the tubing. To make doubly-sure this doesn’t happen, hang the first 30-40cm of the tube above the cup.
To use, squeeze the tubing over the gutted grease nipple. If the fit is too loose, tie it in place with a bit of string, thread or light wire. Press the lid onto the cup and route the tubing away from the fire and then through wet soil, wet cloth, etc. and into the neck of the canteen, waking sure that the canteen is at a lower level than the cup and the tube, even if you have to scrape out a hole for it.

Steam is forced through the grease nipple and into the tubing where it condenses into liquid and drips into the canteen. This setup must be watched and maintained carefully to avoid burning the hose and refill the cup with contaminated water/mud/etc. as needed.
USING YOUR BILLYCAN FOR DISTILLING DRINKING WATER
A method similar the to the cups canteen still can be improvised with a billycan, some tubing and a bit of alfoil. Incidentally, the alfoil will also work with cups, canteen still if you don’t have, or can’t make a proper lid.
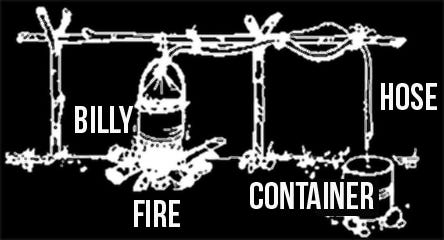
Make a conical lid for the billy out of alfoil and tie or wire the end of the rubber tubing into it. Wire the alfoil lid onto the billy, perhaps with a wooden toggle release so it’s easily removable. Route the tubing up and away from the fire, perhaps on a wooden frame, and down into another container situated at a lower level than the billycan. For best results, wrap the tubing in wet cloth or under some wet soil.
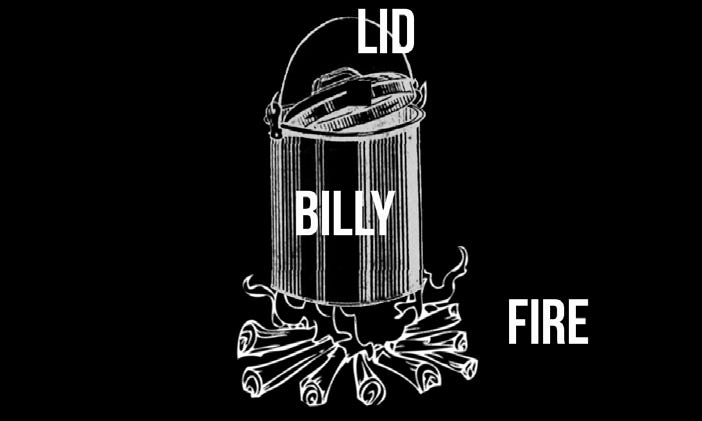
A billycan method which is easier still requires only a billycan, a domed or dished billy lid and a container to catch the water.
Simply boil the contaminated water/urine/entrails/mud/grated fern rhizomes/ etc. Steam will rise and be caught on the underside of the billy lid. Carefully lift off the lid and knock the droplets into another container. This is probably the absolute simplest method of water distillation suitable for bush survival. It will work with any lidded water tight metal container, including the canteen cup lid described earlier. It will of course also work with an improvised lid made of alfoil or even thick plastic if used with care on a low fire.
A variation of the billy lid method uses a billy, canteen cup, PSK container or improvised boiling vessel, and a transpiration bag. The bag is supported above the boiling vessel on a wooden frame and is set at an angle. The steam from the boiling contaminated water rises and condenses on the plastic, which being set at an angle funnels it into a waiting container.
USING SALVAGED MATERIALS TO DISTILL LARGE AMOUNTS OF DRINKING WATER
If you are stranded due to a vehicle breakdown, shipwreck or aircraft crash, you may be able to improvise a water distillation unit from salvaged parts. In the bush or the desert, you can sometimes come across old fuel or oil drums, which make distilling large amounts of water, enough for a small group, economical.
The examples here used old 200 litre and 30 litre oil drums and some metal pipe - all salvaged from an abandoned outstation in the far west of NSW. Old steel jerrycans, rags and some vehicle heater hose would do just as well.
The most advanced unit has a 200 litre drum connected to a 30 litre drum by a piece of pipe. Rags ripped from clothing and tied around both ends of the pipe create a seal with the bung holes in the drums. A hole is poked in the small drum through which the distilled water drips into a canteen or other container.

To use, a trench fire is dug and the bottom of the large drum set on it at about a 45 degree angle. The smaller drum is supported by a bush timber tripod. Making sure the large drum is only filled to about 2/3rds capacity to avoid splashing into the smaller drum, a fire is lit and the water in the drum boils. As with any method of distillation this one relies on contaminated water evaporating into steam which is then condensed back into clean water and funneled into a storage receptacle.
This particular distillation unit will yield up to 20 litres of drinkable water in a 24 hour period. That’s one jerrycan’s worth every day. More than enough to keep one person alive, and is perfect for small groups in an emergency.
Another method requires only one drum, a piece of pipe as a connector, or an improvised connector such as discarded beer or soft drink cans, and the transpiration bag from your personal or vehicle survival kit.

Fill the drum 2/3rds with contaminated water and place it on the fire at an angle. Insert the connector and seal the join with cloth, mud, etc. then tie it to the neck of the transpiration bag. At this point, make sure that the transpiration bag is mostly deflated, so as to avoid bursting it.
Contaminated water in the drum is heated to boiling point and begins to evaporate. The steam travels through the connector pipe and into the transpiration bag where it condenses into liquid and runs into the lowest point of the bag, which then acts as a clean water reservoir.
This method works as well as the advanced version , but it must be monitored closely and the fire kept as low as possible. A large fire will heat the connector and melt the bag, and it will also cause a pressure buildup which could over-inflate the bag, which at best will funnel condensed water back into the drum, but at worst could burst the bag.
Care should also be taken when removing the bag from the pipe for emptying. If the contaminated liquid in the drum is still boiling, steam burns could result.
Distilling water is a reliable method of water procurement and purification, but it is not recommended for long-term use since distilled water lacks most of the minerals required for the proper functioning of the human body and after a certain point, distilled water will begin to strip these same minerals out of your system, causing ongoing problems down the track. However, as an immediate-use survival method in areas with contaminated water or seawater, it’s one of the most important methods to be aware of.