


Make Your Own Canvas Water Bag

The canvas water bag is a classic piece of equipment which was widely adopted in Australia from about the 1860s onwards. They were carried by swaggies and stockmen and were present at Gallipoli to provide cool water to the troops, and they have been used by outback travellers for more than 100 years. You occasionally still see them on the bullbars of 4WD vehicles and they can be purchased new, so they aren’t extinct yet.
The water bag was originally made from flax canvas since this has optimal soaking and water retention qualities over other forms of canvas. Despite this, water bags can be made out of any heavy natural fabric which is capable of holding water. Even normal truck tarp canvas is great for the purpose.
The idea is that the canvas is soaked for around 48 hours before being used and since this swells the fibres, it allows the canvas to hold water, only losing a little which seeps through the fabric, with surface tension between the fibres holding the bulk of the water in the bag.
Placed in a shaded and breezy spot on even the hottest day, the canvas water bag will provide cool water. It does this through evaporative cooling. Since the water is constantly wetting the canvas, the wind and heat evaporate it which has the effect of cooling down the bag in much the same way that as human beings, our sweat can help to cool our bodies down on a hot day as long as there is the slightest breeze which reaches our skin.
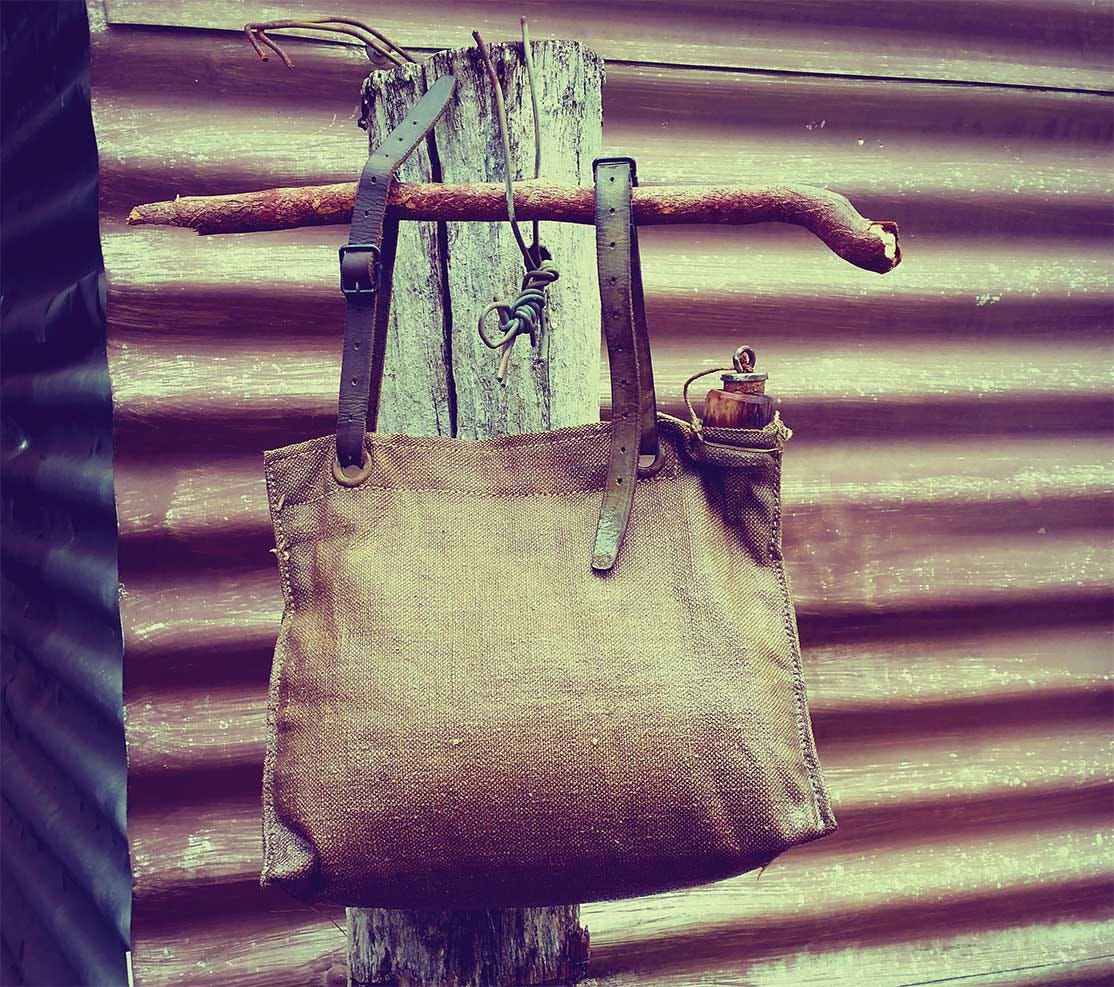
It’s easier than you might think to make a water bag. The one we’re making here is a replica of a 1930s-40s 6 pint water bag which can be strapped to a car’s bullbar, strapped to a saddle, hand-carried and will even sit upright.
To begin with you need some canvas. As mentioned before, you can use any sort of heavier densely-woven canvas. Truck tarp canvas is a good choice, but you may find that a canvas dropsheet from a hardware store like Bunnings will work if you boil it first to shrink it. If you want the correct fabric, you can find it as artist’s supplies. The stuff you’re after is either 12 oz. unprimed flax canvas, or 12 oz. unprimed cotton duck “canvas blanket”.

Once you have your base fabric, you’ll need to get together the correct tools and other materials. You will need -
Tools:
Tailor’s chalk or black texta marker
Sharp dressmaker’s scissors or EMT shears Sewing machine or awl and palm or needle
Grommet setting tool
Wood saw
Sharp knife for carving
Drill with large bit or brace and bit
Hole punch
Stove/heat source
Heat resistant container such as a galvanised bucket or a large billy
Materials:
1.5m canvas (or 3m if the canvas you have is thin - 8oz or under)
#69 thread
A piece of black wattle approx 35-40mm in diameter
Olive oil
Beeswax
A cork
A piece of string
2 x brass grommets
2 x leather straps
Putting it together.
Boiling the canvas.
Before you start you first need to remove any waxes or oils out of your canvas. You don’t want it to be completely waterproof, instead you want to rely on the weave of the canvas. The quickest and easiest way to remove any waterproofing compounds is to boil the canvas. If you’re using cheap canvas dropcloth material, boiling it may cause it to shrink a little which is a good thing.
For this design, you’ll need around 1.5m of canvas (this is excessive, but allows for shrinkage). Bring a big pot or galvanised metal bucket of water to the boil, dump in the canvas sheet and allow it to simmer away for a couple of hours.
When it’s good and boiled, wash it in a couple of changes of fresh, cold water. This will have removed any waxes, oils and even some dyes from the canvas.
Allow the canvas to dry thoroughly before moving on to the next steps.
Cutting it out.
Using the dimensions in the diagrams as a guide, you’ll need to mark out the bottom and sides piece as well as the two triangular end pieces using tailor’s chalk or a black texta. If you have neither tailor’s chalk or a texta, use a pencil.

Measure out and mark up the dead centre of the long sides of the bottom/sides piece and the dead centre of the base of the triangular end pieces.
Sewing it up.
This step is going to be much easier with a sewing machine, but it can be done by hand if you have the time and patience.
You need to hem the edges of each piece of canvas with a single line of stitching to ensure there’s no fraying which will compromise the water-carrying capability of the bag.
Put the centre marks on the base/sides piece to the centre mark on each triangular end piece together with a stitch or two.
Now sew the pieces together along all thee sides of the triangle, making the stitches as small and close together as possible.
When you’re done, you should have a canvas bag with an open top. You’ll see at this point that the water bag has taken its basic shape. Now sew a line of stitching across the top, but leave the last 40mm of one end unstitched.
This is where we’ll insert the wooden spout.
Put in a large rectangular stitch around the grommet’s area (see big diagram for an idea of the stitch lines) and that’s the basic structure of the water bag done. Now onto the fine detail.
The spout.
Here’s where your bush construction skills come in handy. Select a hardwood branch about 40mm in diameter. A recently fallen branch is best since it will season nicely. I use black wattle, but you can use any Aussie hardwood you like.

Using your wood saw, cut off a piece branch about 40mm long and strip off the bark and smooth any imperfections. You can safely carve it down by about 5mm if you like - that’s up to you.
Now you’ll need to drill a hole through the centre of the bit of wood. Easiest is to use a cordless drill, but if you want to go traditional you can use a bit and brace, or if you want to go primitive you can try ember-burning the hole.
Once you have the hole drilled, you need to carve a groove in the spout which allows it to be held into place in the bag by a couple of long stitches. This groove should be carved about 10mm from the bottom of the spout. Make it 1-2mm deep.
Once carved, you should burnish the wood to smooth it down. A hot soldering iron works well or you can cold burnish it using a metal spoon or similar. I add a bit of olive oil to the wood to keep it from cracking after long use and I rub a little beeswax into the edges of the spout.
Push the carved spout into the gap in the top of the water bag and put a couple of lines of stitching up the side to hold the spout in place. Now stitch around the groove in the spout with one large stitch. Do this several times and the spout will stay in place.
Insert a cork stopper of the correct size and tie a bit of string to it. The other end of the string will be tied off to one of the grommet holes...
The grommets.
The grommets allow you to carry the bag or strap it to a bullbar or saddle. Use No. 6 grommets or larger. You’ll need two sets.
Mark out the place you want the grommets to go, then punch a hole. Using the grommet setter, set the two brass grommets.
Install the leather straps through the grommets. For hand-carry of the water bag, you can slip a stick through the leather straps as a comfortable handle.
If you plan on only hand-carrying the water bag, then dispense with the grommets and leather straps all together and instead make up some canvas loops which can be sewn into place. As with the leather straps, you simply slip a stick through the loops to act as a handle.
This canvas loop system was used extensively prior to the introduction of the motor car. Apart from being hand-carried, it allowed the bag to be hung up on a post by a nail or bit of string. It’s probably the most traditional of the handle designs.
Preparing for use.
First wash the bag with clean warm water to remove any sawdust or sewing machine oils and to prime the stitching. Then fill the bag with water. You will notice at this point it leaks like a sieve. This is because the fibres haven’t yet swelled.

Fill a bucket or tub with clean water and soak the water bag for a minimum of 48 hours. This will swell the fibres and allow it to hold water.
After it has soaked, the water bag may still leak from around the seams, particularly if you used nylon rather than cotton thread to sew the water bag. It may also happen if the needle you used was too large and the soaking didn’t allow the stitching holes to close up. In this case simply rub a candle vigorously over the lines of stitching to help waterproof them. You will still lose a little water through the seams, but not enough to become a problem.

Now enjoy your cool water.