


How to Make WWII-Style Dehydrated Emergency Rations at Home

During WWII, there were several types of emergency rations used by Australian and Allied forces. These were designed for use in survival situations where soldiers or aircrew may find themselves behind enemy lines, or where a shipwrecked sailor may find his dinghy washing up on a deserted or enemy-held island. The rations had to be lightweight, compact and high in calories. Taste was a secondary consideration, but despite this, most of them didn’t taste too bad. Every military force during WWII issued some sort of standardised emergency ration and most defence agencies around the world still do.
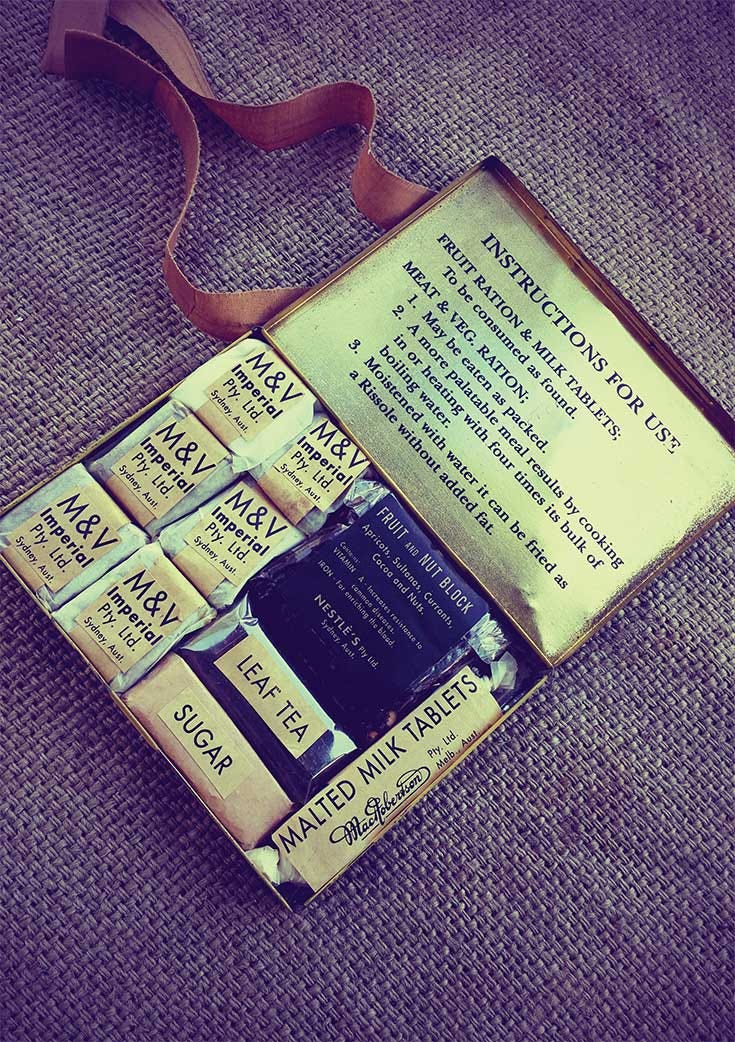
In this article we are going to look at the Australian Military Forces Type A1 Emergency Ration as used by Australian forces during WWII, components of which still have promise as lightweight emergency or even bushwalking foods today. They can be made at home with a minimum of equipment. These were the first emergency rations to be wholly developed in Australia and were issued from the Kokoda Campaign onwards until they were completely replaced by the Type A3 in late 1944. Designed to be a lightweight substitute for the army’s “Iron Ration” of bully beef and biscuits which had been in use since before the Boer War, the Type A1 Emergency Ration was packed into a “flat fifty” cigarette tin which was carried in the soldier’s left breast pocket.

The ration contained the following:
6 x blocks of dehydrated meat and vegetables (M&V)
1 x fruit and nut block
A sachet (later compressed tablets) of leaf tea
Sugar cubes
Malted milk tablets.
The dehydrated meat & veg and the fruit and nut block can be made in your own kitchen, while the rest of the ingredients can be bought off the shelf or online.
Meat & Vegetable Blocks
These should be of particular interest to any overseas bushcraft enthusiasts who may read this since they were developed along the same idea as that North American standby, pemmican. Indeed, the initial prototypes of the Type A1 emergency ration actually used pemmican, but the troops who trialled it weren’t impressed. Instead, the M&V blocks were created from scratch using mutton, onion, potato, wheat germ and carrot along with salt and pepper and vegetable fat. Since they were fully cooked during their manufacture, these could be eaten dry, but the best and most tasty result came from using the blocks as a stew or soup base. Another way of preparing them was to wet down the block and fry it up in a mess tin as a sort of rissole.
And what about the taste? Not bad at all. I didn’t use pepper, salt, onion or carrot during my early experiments and the result was a bit dire. Definitely don’t leave them out.
Ingredients list:
500g minced lamb
1 medium-sized fresh carrot
1/4 cup of dehydrated potato flakes or powder
Two tablespoons of onion flakes or powder
1/4 cup of stabilised wheat germ
Two good pinches of salt
A pinch of black or white pepper
100g copha - vegetable shortening.
Here’s how you go about making Emergency Ration M&V blocks:

Step 1. Cook the meat. The wartime recipe calls for minced mutton. I used minced lamb, but pork, beef or roo would be just as effective. If you’re vegetarian, mince up some mushroom in place of the meat and give it a go using the same basic recipe.
Cook the minced meat in a frypan until it is just browned, but cooked through.
Take the cooked meat off the heat and place in a colander.
Pour one or two kettle’s worth of boiling water over the cooked meat to rinse out residual fat (animal fat can cause the M&V blocks to go rancid in storage. The fat is replaced with vegetable fat).
Set the rinsed meat aside.
Step 2. Prepare the carrot. It was found that the addition of dehydrated, minced raw carrot added a pleasant texture to the finished product. The carrot also adds a little vitamin content which never goes astray in any austere environment.
Grate a raw carrot into a bowl.
Set the grated raw carrot aside.
Step 3. Dehydrate the components. In order to keep, especially in a tropical environment, the M&V blocks needed to be dried. This also had the happy effect of making the finished product lighter and less bulky. You can dehydrate in a commercially available, purpose-built dehydrator or you can use your kitchen gas or electric oven set on a low heat of around 70-80°C with the door chocked open with a wooden spoon or similar to allow airflow.
On one tray place the dehydrated minced meat in one relatively uniform thin layer.
Place the carrot on another tray in a single thin layer. The carrot, being wetter, will take longer to dehydrate than the meat.
Turn on the dehydrator and dehydrate for around 7-8 hours or until the meat can be crumbled into a dry powder and the grated carrot is all dry and flexible to the touch. If you do not dehydrate these ingredients correctly you are setting yourself up for potential food poisoning, so over-dehydrate if in doubt.
Step 4. Grind the components. Grinding the meat and carrot especially reduces the bulk of the finished product, allowing more M&V to fit into a smaller space. You can use a food processor, coffee grinder or even a mortar and pestle. I use a coffee grinder and while it grinds, it thoroughly mixes all the other ingredients at the same time.
Into the grinder, combine dehydrated meat, dehydrated carrot, wheat germ, onion powder, potato powder, salt and pepper.
Grind coarsely for a minute or until all the meat and carrot is ground into tiny pieces.
Grind finely for a minute or two until all the meat is powdered. The finer the better - it should be similar in size to granular white sugar or table salt. Fine powder takes far less time to rehydrate than coarse chunks.
Step 5. Mould the blocks. The finished blocks should measure around 3cm x 3cm and be about 1cm thick. The easiest way to achieve this is to use a 6cm x 6cm square egg ring as a mould and then cut the blocks to size. For the regulation six blocks of M&V you’ll need two square egg rings. The copha works in this instance just like your nana’s chocolate crackles - you’ll see what I mean...
Place the egg ring onto a piece of baking paper on a pan.
Add the M&V powder until it completely fills the space inside the egg ring.
Using a knife or spatula, flatten off the top.
Melt copha in a billy or saucepan over a low heat, then pour a little over the powder in the egg rings until it just wets it all.
Place the egg rings in the refrigerator for an hour until the blocks have set.
Step 6. Make the blocks. This step involves producing the individual M&V blocks and wrapping them for packing into a period emergency ration tin.
Place the set egg rings onto a cutting board. The M&V should set hard enough that the egg rings can easily slip off.
Cut the first M&V block into four equal-sized pieces.
Do the same with the second egg ring, but we only need two of the four equal-sized pieces to make up the six.
Wrap the six blocks individually in greaseproof or baking paper. Some may find that a larger 6cm x 6cm block is preferable to the smaller blocks. That’s up to you.
The Fruit and Nut Block
The fruit and nut block was packed with Vitamin C as well as other vitamins and nutrients. It contained the following ingredients:
Dried apricots
Dried currants
Sultanas
Cocoa
Roasted and salted peanuts

The Fruit & Nut block was one of the more nutritious and popular components of the Type A1 Emergency Ration, so much so that its use continued in the later Type A3 “sardine tin” emergency ration and the two 24hr ration packs used by Australian forces during WWII, the dehydrated “04” Field Operational Ration and the “O2” Operation Ration. Aside from the vitamin A and iron, the Fruit & Nut block naturally included vitamin C which was vital for preventing diseases such as beriberi and scurvy.
When prepared correctly the Fruit & Nut block is a hard square of what feels like compressed fruit mince. It can be eaten as is but it is a difficult chew. Soldiers came up with innovative ways to prepare the Fruit & Nut block, from shaving off small pieces to add to boiling water to make a sweet fruity tea or cold drink if left until it cools. Soaked in a bit of water with a few crushed malted milk tablets added gave the illusion of a bit of slightly chewy plum pudding with a runny custard.
To prepare the fruit and nut block, you need a blender (or hand mincer if you have one), and a dehydrator or oven. Here’s how you go about making the emergency ration fruit & nut block:
Step 1. Mince the fruit.
Take the apricots, currants and sultanas and mince them coarsely in the blender.
Place the minced fruit into a mixing bowl and set aside.
Step 2. Crush the peanuts.
Coarsely crush the peanuts in the blender and then add them to the fruit mix.
Step 3. Combine the mix.
Mix in the cocoa and then press the mixture into a square egg ring.
Step 4. Dehydrate or bake.
Dehydrate the block for between 4 and 6 hours or bake it in an oven on a low heat for an hour. This serves to drive off much of the remaining moisture and leaves the block rock hard.
Step 5. Package the block.
Wrap the block in cellophane for a period look, or vac seal for long-term storage.
The Other Components
The rest of the emergency ration was made up of malted milk tablets, tea and sugar.
Tea: Normal leaf tea can be used. Just measure about 4 x teaspoons into a cellophane bag.
Sugar: Basic CSR sugar cubes are closest to the originals. Four of these are wrapped in greaseproof paper.
Malted Milk Tablets: They still make wartime Horlicks malted milk tablets, just not in Australia. These are still very popular in Malaysia as lollies where they are sold under the brand name of “Horlicks Malties” and they can be found all over eBay. They come in a small box containing three sachets, each with 9 tablets for a total of 27. The Type A1 Emergency Ration used 10 tablets and these are wrapped in greaseproof paper.